How to Find Recently Deleted Files on Mac?
Accidental deletion of important files from your Mac can be frustrating. Whether it’s a document, photo, video, or project file, losing data can disrupt your work and may put you in trouble. Fortunately, several free Mac data recovery tools and methods are available to help you restore your deleted files.
In this guide, we’ll explain to you a few of the most effective methods to find recently deleted files on a Mac, including step-by-step instructions and useful tips to improve recovery chances
Understanding How File Deletion Works on Mac
When a file is deleted on your Mac, it moves to the Trash folder and remains there before being permanently erased. This lets you easily restore files if they were deleted accidentally. However, once the trash is emptied, all the files are not immediately destroyed. Instead, the system marks the space available for new files. Until the new data overwrites that space, data recovery is possible using professional Mac data recovery software tools.
That is why it is important to stop using the Mac as much as possible after you experience data loss. Continuing to save files or install apps can overwrite the deleted data and reduce the chances of recovery.
Why Do Files Get Deleted on Mac?
Identifying the exact cause of your data loss helps you determine an appropriate recovery workaround. Some main reasons why your files get deleted on macOS are:
- Accidental Deletion: You may have accidentally deleted files while browsing other files and folders on your Mac. When organising folders or removing unwanted documents, it’s important to check every file you select.
- Emptying the Trash: As mentioned, every deleted file goes to the Mac’s Trash folder. When you select Empty Trash, all items in the trash are permanently deleted.
- macOS System Cleanup: macOS may automatically delete certain files during system maintenance. These deleted files include cache files, temporary application data, and old system logs.
- Application Errors or Bugs: Sometimes applications may delete or overwrite files due to software errors. If an app crashes while saving or editing a file, the file may become corrupted or disappear.
- File Overwriting: Another common cause of data loss is overwriting files. When a file with the same name is saved in the same location, the system may replace the original file with the new version.
How do I Find Recently Deleted Files on Mac? [Quick Recovery]
Now that you understand how file deletion works on a Mac and the common causes of data loss, the next step is to use the appropriate recovery methods to retrieve your files. Here are some free Mac data recovery workarounds that you can try to find recently deleted files:
Method 01: Check the Trash Folder
Before you apply any technical method to find recently deleted files on Mac, check the Trash folder. When you delete a file by pressing Command + Delete or dragging it to the Trash icon, it goes into the Trash folder. In such a case, you can follow the below steps to restore files from Trash:
- Firstly, click the Trash icon from the Dock.
- Browse through the deleted files and locate the one you want to restore.
- Right-click on that file and select Put Back.
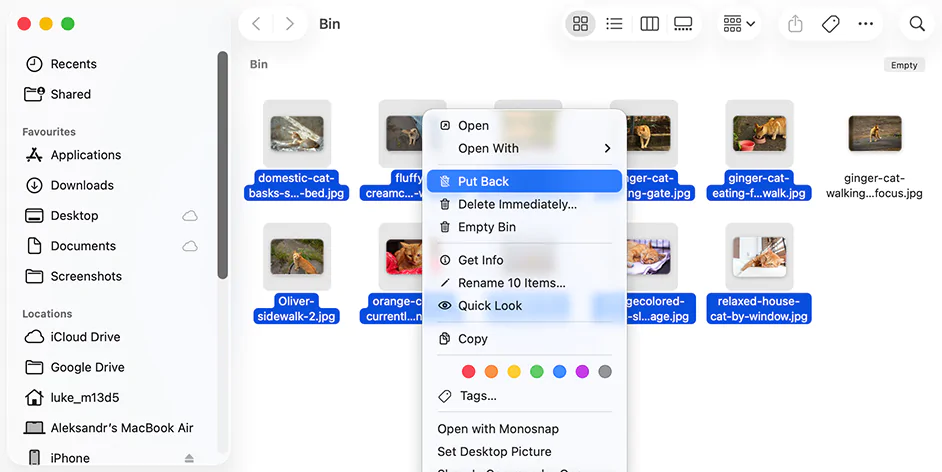
This will return your selected file to its original location.
Method 02: Use Finder’s “Recently Deleted” Options
Some applications, such as Photos, Notes, and Mail on macOS, maintain their own Recently Deleted or Trash sections. This folder stores your recently deleted files for some specific days, say 30 days.
To recover deleted photos using the Recently Deleted/Trash section in the Photos app:
- Launch the Photos app, then click Recently Deleted from the sidebar.
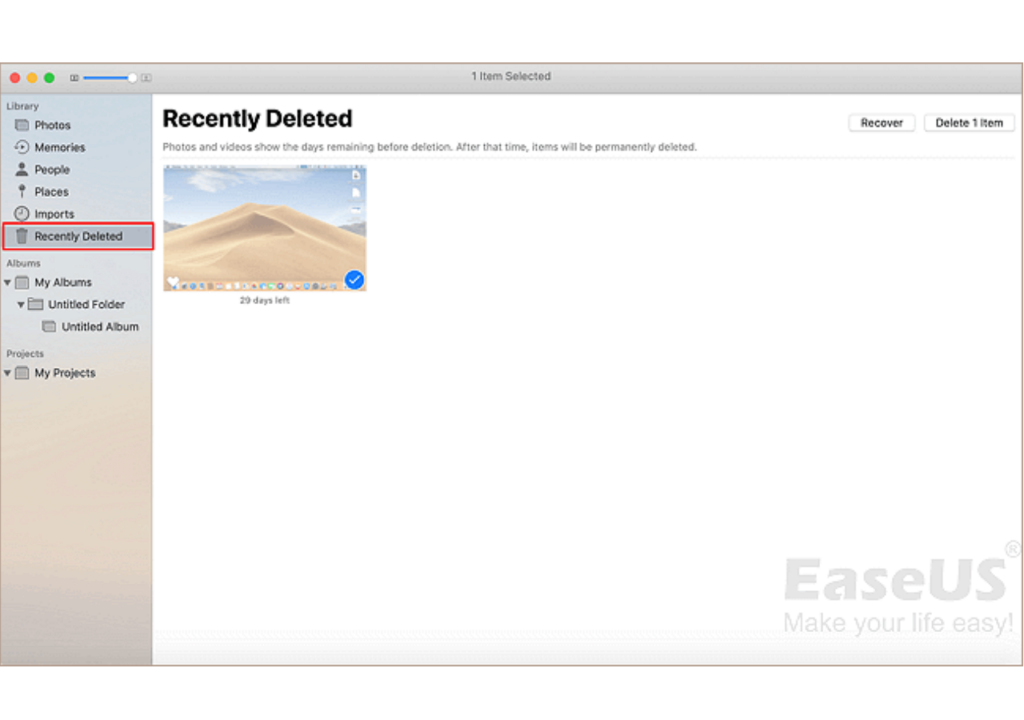
- Select the photo you want to recover.
- Click Recover to save selected photos to your main photo library.
Other Apps with Similar Features
Notes – Recently Deleted folder retains notes for 30 days.
Mail – Deleted emails move to the Trash mailbox.
Files in iCloud apps – May remain in recently deleted areas online.
If your deleted file belongs to one of these apps, checking the app’s recovery section can help.
Method 03: Restore Using Time Machine
macOS provides a built-in Time Machine backup utility, which, when synced on your Mac, automatically creates backups of its files. You can follow the below steps to recover files with Time Machine:
- Connect the Time Machine backup external drive to your Mac.
- Open the folder where the deleted file originally existed.
- Click the Time Machine icon from the menu bar.
- Select Browse Time Machine Backups.

- Use the timeline on the right navigation pane to an earlier state.
- Locate the file you want, then click Restore.

This will save the selected file to its original location.
Method 04: Use Free Mac Data Recovery Software
If the above DIY methods to find recently deleted files on Mac fail, you can use third-party free Mac data recovery software to get them back. Tools like Stellar Data Recovery Free for Mac are especially designed to help you restore files deleted from your Mac due to several reasons. The software supports data recovery lost due to accidental deletion, formatting, system failure, and many other reasons. The free version particularly allows you to restore deleted files up to 1 GB for free without requiring a paid upgrade.
Follow the below steps to recover your deleted files using this free Mac data recovery software:
Step 1: Download and install the Stellar Data Recovery Free software (macOS version) from its official website on your Mac.
Step 2: Launch the software and from the homepage, select the type of files you want to recover and click Next.
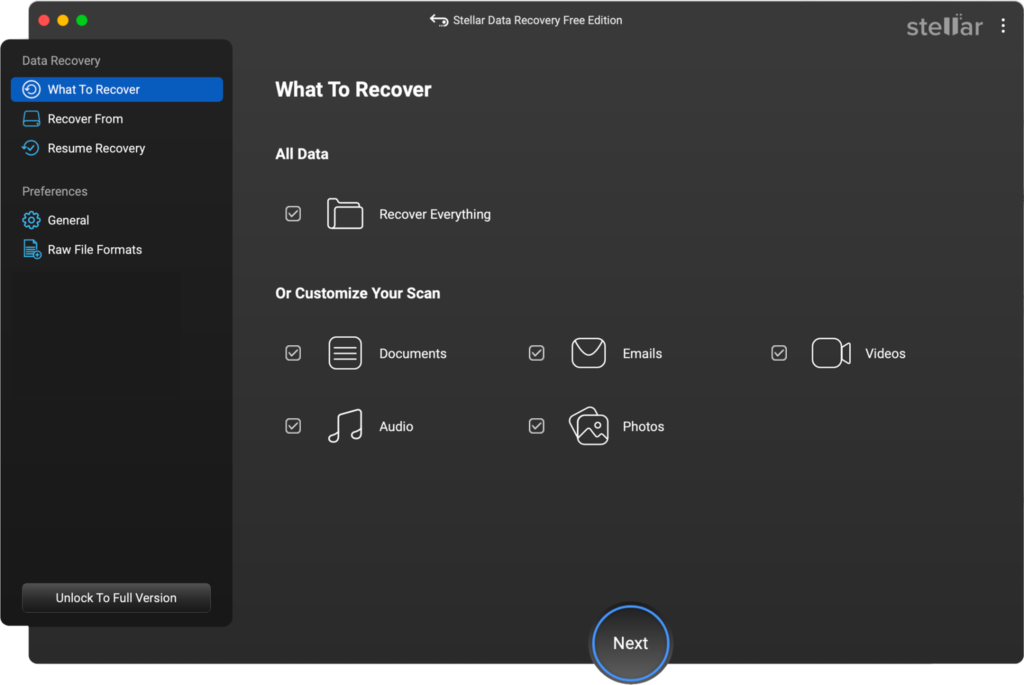
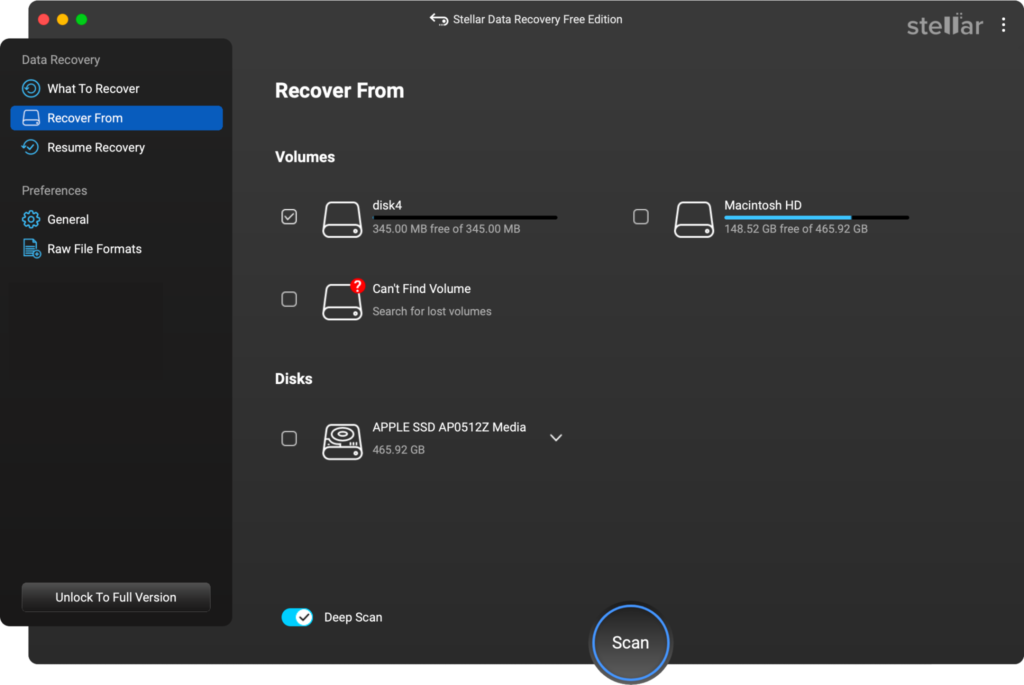
Step 3: Choose the location where the files were originally stored and click Scan to initiate the scanning process. For most users, this will be the Macintosh HD.
Step 4: Once the scan is complete, preview the recoverable files and choose the one you want to restore. Click Recover to save the recovered data to a destination folder.

Additional Tip: How to Increase File Recovery Success?
When you encounter data loss on your Mac, you can consider the following tips to improve recovery chances:
- Stop Using the Drive: Avoid saving new files on your Mac’s drive, as this may overwrite deleted files and make recovery difficult.
- Use External Backup Drives: If recovery requires installing third-party Mac data recovery software, use an external drive to install and save recovered files.
- Act Quickly: The sooner you act, the easier it will be for you to restore deleted files. Recovery chances decrease over time as the system writes new data.
Wrapping Up
Data loss on your Mac can be painful, but thanks to the aforementioned free Mac data recovery methods, you can help you restore your lost files. The first step is always checking the Trash folder, which allows quick restoration of recently deleted files. If the Trash is empty, you can try other solutions, such as checking the app-specific Recently Deleted folders or Time Machine backups, to restore the data. For situations where built-in methods fail, third-party free Mac data recovery software like Stellar Data Recovery Free for Mac can help you.
By understanding these recovery methods and maintaining proper backups, Mac users can handle accidental file deletion with confidence and avoid permanent data loss.
You May Also Like TO Read: Discover the Emotional World of Teach Me First: A Complete Guide to the Honeytoon Sensation