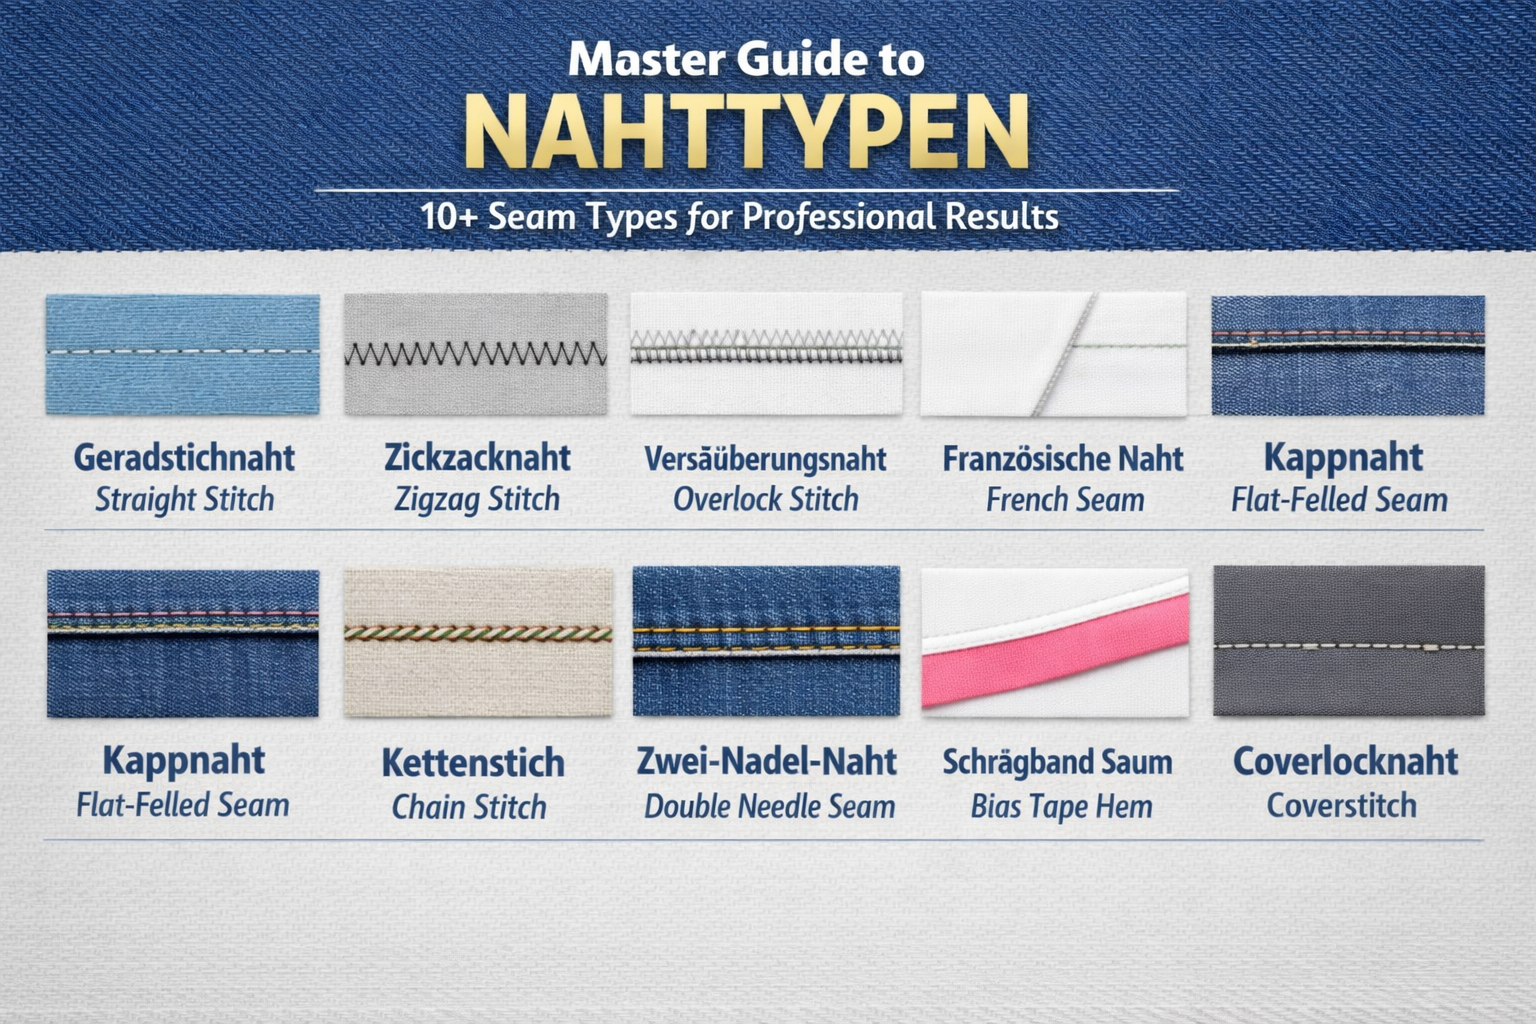
Nahttypen
The Ultimate Professional Guide to Nahttypen: How to Sew Like a Master
Have you ever wondered why some handmade clothes look like a high-end designer piece while others look like a school project? The difference almost always lies in the technical choice of Nahttypen. When you start a sewing project, the seam is more than just a line of thread; it is the structural engineering that holds your creation together. If the engineering is wrong, the garment fails. In this comprehensive guide, we will dive deep into the world of professional Nahttypen. Whether you are working with delicate silk or heavy-duty denim, understanding these techniques will elevate your craft from hobbyist to expert.
Why Choosing the Right Nahttypen is a Game Changer
In the world of garment construction, the relationship between fabric and stitch is sacred. Imagine sewing a high-stretch yoga legging with a rigid, non-flexible straight stitch. The first time you stretch, the thread will snap because it cannot handle the tension. This is a classic example of using the wrong Nahttypen for the material. Different Nahttypen provide different levels of strength, elasticity, and aesthetic finish. By mastering these variations, you ensure that your projects are not only beautiful but also durable enough to survive years of wear and repeated washing.
1. The Simple Plain Seam: The Foundation of All Sewing
The plain seam is the starting point for almost every tailor. Among all the Nahttypen, this is the most frequently used. It consists of two layers of fabric joined by a single line of stitching, usually with a standard straight stitch. It is the perfect choice for stable, non-stretch woven fabrics like cotton poplin, linen, or wool. However, even this simple technique requires precision. You must ensure your “seam allowance” is consistent—usually 5/8 of an inch. While it is the simplest of Nahttypen, its success depends entirely on your thread tension. If the tension is off, your seam will either gap or pucker, ruining the silhouette of your garment.
2. The Zigzag Seam: Versatility and Edge Protection
If the plain seam is the foundation, the zigzag is the protector. This is one of the most essential Nahttypen because it serves two major purposes. First, it is the primary way to finish raw edges to prevent fraying if you do not own an overlock machine. Second, because the stitch moves side-to-side, it has a built-in “mechanical stretch.” This makes it one of the few Nahttypen on a standard home machine that can actually handle knit fabrics like jersey. I often recommend beginners practice their zigzag width and length settings on scrap fabric first, as this versatility makes it a powerhouse in any sewing room.
3. The French Seam: The Peak of High-End Elegance
If you look inside a blouse from a luxury brand like Chanel, you won’t see raw edges or messy threads. You will see the French seam. This is one of the most prestigious Nahttypen because it completely encases the raw edge of the fabric inside a second seam. It is a two-step process: you sew the fabric with “wrong sides” together first, trim the allowance, and then sew again with “right sides” together. This creates a tiny, neat “tube” of fabric that looks as beautiful on the inside as it does on the outside. Among all professional Nahttypen, this is my top recommendation for lightweight, sheer fabrics like chiffon, organza, or silk.
4. The Flat-Felled Seam: Built for Durability and Denim
When you look at the inseam of your favorite pair of jeans, you are looking at a flat-felled seam. This is widely considered the king of heavy-duty Nahttypen. It is incredibly strong because it involves interlocking the two pieces of fabric and then double-stitching them flat. This creates a seam that can withstand immense “pull” or “shear” force. In my years of making outdoor gear and workwear, I have found that no other Nahttypen offer this level of security. It is also reversible, meaning both sides of the seam look finished and flat, making it perfect for unlined jackets or reversible tote bags.
5. The Mock French Seam: A Practical Alternative
Sometimes, a true French seam is too bulky for a curved area like an armhole. This is where the Mock French seam comes in. It is a clever variation of traditional Nahttypen where you sew a plain seam, fold the raw edges inward toward each other, and stitch them together. This provides the same clean look as a French seam but allows for more control on curves. It is an excellent choice for intermediate sewers who want to upgrade their finish without the complexity of the full two-step French process. Understanding these subtle differences in Nahttypen is what separates a tailor from a beginner.
6. Overlock and Serger Seams: The Industry Standard
If you want your clothes to look “store-bought,” you need to understand overlock Nahttypen. A serger machine uses 3, 4, or even 5 threads to wrap around the edge of the fabric while simultaneously cutting off the excess. This creates a very tidy, flexible edge that is the standard for almost all modern ready-to-wear clothing. The 4-thread overlock is particularly useful because it sews a safety stitch while finishing the edge, making it one of the most efficient Nahttypen for high-speed production. If you are serious about making a lot of clothing, investing in a machine that handles these specific stitches is a must.
7. The Blind Hem: The Art of Invisible Sewing
There are times when the best seam is the one you cannot see. For formal trousers, suit jackets, or elegant curtains, a visible line of stitching at the bottom would look unprofessional. The blind hem is one of those specialized Nahttypen that uses a unique “V” shaped stitch to barely catch the surface of the fabric. When done correctly, the thread is invisible on the front of the garment. It requires a specific presser foot and a bit of practice with folding, but once you master it, your clothes will look significantly more expensive. It is the “secret weapon” in the catalog of professional Nahttypen.
8. Elastic and Stretch Seams for Activewear
We live in an age of “athleisure,” where everything from our work pants to our gym gear is made of 4-way stretch fabric. This requires specific elastic Nahttypen. A standard straight stitch will simply break when the fabric expands. Instead, we use the triple-straight stitch (also called the “stretch stitch”) or a narrow zigzag. These stitches are designed to move like an accordion. Among all the available Nahttypen, these are the most critical for ensuring that your leggings or swimsuits don’t fail during a workout. Always pair these stitches with a stretch needle to avoid skipped stitches.
9. Decorative and Topstitching: Adding Personality
Seams aren’t just for holding things together; they are also for design. Topstitching is when you sew a visible line on the “right side” of the fabric, usually to keep a seam allowance lying flat. However, many modern machines also offer decorative Nahttypen like the honeycomb stitch, feather stitch, or satin stitch. These can be used to add a personal touch to a collar, a cuff, or a pocket. When using these more complex Nahttypen, I always recommend using a stabilizer or a slightly thicker “topstitching thread” to make the pattern stand out and look crisp.
10. The Lapped Seam: Special Solutions for Leather and Felt
Not all fabrics behave the same way. Leather, suede, and heavy felt do not fray, so they don’t need to be turned under. For these materials, we use lapped Nahttypen. This is where one piece of fabric is simply laid on top of the other and stitched down. It reduces bulk and creates a very modern, architectural look. Because leather is expensive and a needle leaves a permanent hole, you have to get these Nahttypen right the first time. Using “wonder clips” instead of pins and a Teflon foot will help you navigate these tricky but rewarding techniques.
11. Troubleshooting: Mastering Tension and Feed
Even if you choose the perfect Nahttypen, things can still go wrong. The two most common enemies of a good seam are incorrect tension and “fabric creep.” Fabric creep happens when the top layer of fabric moves faster than the bottom layer, leading to a mismatched end. To prevent this, professional tailors often use a “walking foot” or “dual feed” system. Additionally, you must adjust your tension based on the thickness of your chosen Nahttypen. A heavy flat-felled seam requires a different tension setting than a delicate French seam. Always keep a scrap piece of your project’s fabric nearby for testing.
12. The Role of Needles and Threads in Seam Integrity
The strength of your Nahttypen is only as good as the thread and needle you use. If you use a thin, cheap thread for a high-stress seam, it will eventually snap. For most projects, a high-quality “all-purpose” polyester thread is best because it has a slight bit of give. For the needle, you must match the size to the fabric weight. A size 70/10 needle is perfect for fine Nahttypen in silk, while a 100/16 is necessary for denim. Remember, a dull needle is the number one cause of ruined fabric and skipped stitches. Change your needle every 8 hours of sewing time to keep your seams perfect.
13. Mastering the Curve: How to Sew Seams on an Arc
Sewing a straight line is easy, but sewing a curved seam—like a neckline or a princess seam—is where true skill is tested. For curved Nahttypen, you often need to “clip” or “notch” the seam allowance. This allows the fabric to spread or fold without bunching up once it is turned right-side out. If you don’t do this, your seam will look lumpy and distorted. It is these small, “invisible” steps in the process of creating different Nahttypen that result in a garment that fits the body perfectly.
Frequently Asked Questions (FAQs)
1. What is the most durable of all Nahttypen for kids’ clothes? The flat-felled seam is the winner here. Because it is double-stitched and the edges are encased, it can handle the rough-and-tumble play of children without ripping.
2. Can I use a regular sewing machine to achieve professional-looking Nahttypen? Absolutely! While an overlock machine is nice, you can achieve amazing results using the French seam or a zigzag finish on a standard machine.
3. Why do my seams look wavy when I sew jersey fabric? Wavy seams are usually caused by the machine stretching the fabric as it sews. To fix this, reduce your presser foot pressure or use a walking foot to ensure both layers move at the same speed.
4. How do I know which of the Nahttypen to choose for my project? Look at two things: the weight of the fabric and the amount of stress the seam will take. Lightweight fabrics love French seams; heavy fabrics require flat-felled or plain seams with a strong finish.
5. Is backstitching necessary for all Nahttypen? Most of the time, yes. It locks the thread so it doesn’t unravel. However, for some decorative stitches or when you will be crossing the seam with another line of stitching, it may not be needed.
6. What thread should I use for decorative topstitching? Use “Topstitching Thread.” it is thicker and has a higher sheen, which makes your Nahttypen pop and look like professional designer work.
Conclusion: Elevate Your Sewing to the Next Level
Mastering the various Nahttypen is the single best way to improve the quality of your sewing. It allows you to tailor your technique to the specific needs of your fabric and the intended use of the garment. Don’t be afraid to experiment with new stitches on scrap fabric before committing to your main project. With practice and the right knowledge of these Nahttypen, you will soon be creating clothes that aren’t just “homemade,” but truly “hand-crafted” to a professional standard.
You may also like to read: Charli XCX Tour 2026: Dates, Tickets, and Brat Summer Secrets