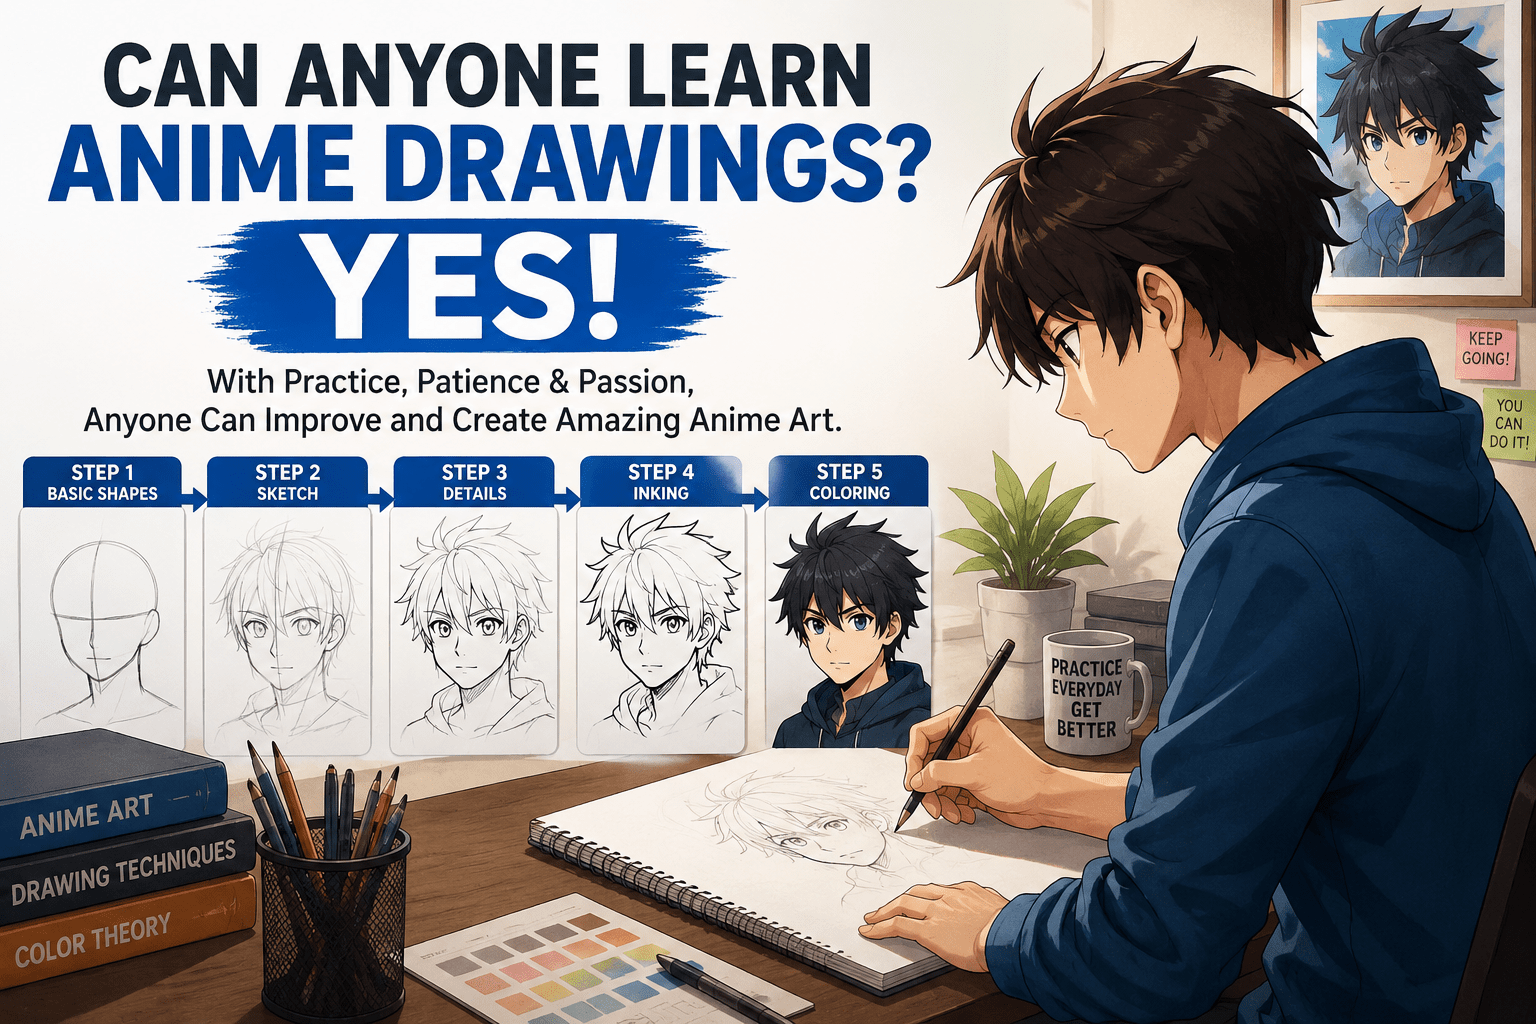
Can Anyone Learn Anime Drawings? Yes
Can Anyone Learn Anime Drawings? Yes — Here’s Exactly How
Introduction
You draw something. It looks nothing like anime. The proportions feel wrong, the face looks stiff, and no tutorial seems to explain why yours keeps coming out flat. Thousands of people hit this exact wall — and most of them quit here. But here is the truth: anime drawings are built on a repeatable system. Once you know the rules behind the style, every face, every pose, and every expression becomes a problem you can actually solve.
Why Anime Drawings Have a Learning Curve That Most Guides Skip
Anime looks simple from the outside. Big eyes, sharp hair, clean lines — how hard can it be?
Quite hard, actually. And not for the reasons most people think.
The real challenge is not the complexity of the drawings. It is the gap between what you see and what you understand. When you look at a well-drawn anime character, your brain processes the finished result. It does not show you the 15 construction decisions the artist made before drawing a single visible line.
Every professional anime drawing starts with a hidden skeleton — proportion guides, center lines, eye placement markers — that disappears under the final ink. Beginners skip this invisible layer. That is why their drawings look off even when each individual feature looks fine in isolation.
This guide teaches the invisible layer first.
What Actually Separates Anime Art from Every Other Drawing Style
Anime drawings do not belong to one single look. The style covers everything from the soft watercolor worlds of Studio Ghibli to the sharp, hyper-detailed character sheets used at Wit Studio for productions like Attack on Titan.
What ties all of it together is a shared visual grammar — a set of rules every anime artist follows, consciously or not.
Proportion over accuracy. Anime does not try to copy how a real face looks. It tries to make a face communicate clearly and emotionally at a glance. That is why the eyes are enormous and the nose is nearly invisible.
Line as language. The weight, confidence, and direction of every line in an anime drawing carries meaning. A thick outer silhouette separates the character from the background. A thin inner line defines a shadow or fabric fold. This is intentional, not decorative.
Emotion over detail. A face in anime with three marks — curved brow, curved eye, small mouth arc — can express complete joy or complete devastation. Detail gets added where emotion lives, not where anatomy demands.
Knowing this before you draw changes how you see the entire style.
The 8 Building Blocks Behind Every Strong Anime Drawing
Whether the artist works on paper with ink pens or on a Wacom tablet in Clip Studio Paint, the same eight foundations appear in every clean anime drawing.
1. Round skull with a tapered jaw The head starts as a near-perfect circle for the cranium. The jaw then drops and narrows into a soft point. This shape is more exaggerated in female characters, slightly broader and squarer in male ones.
2. Large, descriptive eyes Anime eyes sit in the lower half of the face. They are the primary communication tool of the character — shape, size, and color all signal personality before a single word of dialogue appears.
3. A nose that mostly disappears In profile, the nose gets a small bump or curved line. Facing front, it reduces to a shadow dot or a single upward tick mark. Beginners often overdraw the nose, which immediately breaks the anime look.
4. A mouth that does a lot with very little A single curved line handles most expressions. The mouth only gains full detail — lips, teeth, tongue — during dramatic or wide-open poses. Subtlety here is the goal.
5. Hair that moves as one object Anime hair behaves more like flowing fabric than individual strands. Artists block in 4–8 large hair sections first, then add tips and a few flyaway strands. The mass moves together.
6. Deliberate line weight variation Outer edges of a character use heavier, darker lines. Interior detail lines stay thin and light. This contrast is not optional — it is the core technique that makes anime drawings pop visually.
7. Head-based body proportion system The body height gets measured in units of head height. This gives artists a reliable scale system that works regardless of the character’s age or style.
8. Shadow placed, not blended Anime shading places flat shadow shapes with hard, clean edges. The shadow does not fade into the base color. It sits on top of it, bold and deliberate.
Step-by-Step: Drawing an Anime Face That Actually Looks Right
This sequence works. Follow it exactly before trying shortcuts.
Step 1 — Start with the cranium circle Draw a light, loose circle. Do not press hard — this is construction, not finished art. The circle represents the top of the skull.
Step 2 — Drop a vertical center line Draw a straight line through the middle of the circle, extending below it. This becomes your symmetry guide. Every feature on the left must mirror the right.
Step 3 — Find where the chin lands The chin sits roughly one circle-radius below the bottom of the circle. Mark this point. Connect it to the sides of the circle with two slightly curved jaw lines. You now have the anime head silhouette.
Step 4 — Mark the eye line Place a horizontal line halfway between the top of the full head (circle top) and the chin. This is where the eyes sit — not halfway up the circle, but halfway down the entire head. This single placement change fixes most beginner face problems.
Step 5 — Divide the lower face The space between the eye line and the chin splits into three sections. The nose mark goes at the top third. The mouth sits just above the bottom third. Ears align horizontally with the eyes.
Step 6 — Build the eyes Draw the upper eyelid first — it curves slightly and sits thick and dark. Add the iris as a large circle that gets partially cut by the eyelid. Place a dark pupil inside. Drop two white highlight spots — one large, one small — inside the iris. Add thin lower lash lines. The eye is complete.
Step 7 — Place nose and mouth At the nose mark, draw a tiny upward curve or shadow dot. At the mouth line, draw a single curved arc for a neutral expression. These two features should take five seconds total.
Step 8 — Block in the hair The hairline sits slightly above the top of the circle. Draw the hair in large sections that wrap around the skull. Add tips at the ends. Do not draw individual strands yet.
Step 9 — Ink and erase construction lines Once the pencil sketch reads correctly, trace over it with confident ink strokes. Use heavier pressure on the outer silhouette. After the ink dries, erase all construction lines. The finished face appears.
Anime Eye Drawing: Why This One Skill Changes the Whole Character
Spend time here. Anime eyes do more work than any other feature.
The shape of the eye tells you everything about who the character is before they speak:
- Wide, circular eyes with large pupils — child-like, innocent, open to the world
- Long, narrow eyes with sharper corners — analytical, intense, or calculating
- Downward-slanting outer corners — gentle, kind, or sad
- Upward-slanting outer corners — confident, proud, or aggressive
- Half-closed, heavy upper lids — bored, cool, or exhausted
The pupil shape matters too. Round pupils read as warm and human. Vertical slit pupils signal something dangerous or supernatural. Star-shaped or heart-shaped pupils signal emotional extremes — the character is overwhelmed with a feeling.
Highlight placement shifts mood just as much. A bright highlight at the 11 o’clock position in the upper iris makes the character feel alert and cheerful. Remove the highlight entirely and the eye reads as empty, lifeless, or corrupted — a technique used constantly in anime to signal villains or characters who have lost their sense of self.
Practice drawing 30 different eye types across three sessions. This single exercise teaches more about anime drawings than three months of copying full characters.
Anime Body Proportions: The Chart Every Artist Needs
Body proportions in anime drawings are not fixed — they shift with the character type and emotional tone of the series.
| Character Type | Head-to-Body Ratio | Where You See It |
|---|---|---|
| Chibi / super deformed | 2:1 to 3:1 | Merchandise, comedy inserts, stickers |
| Young child character | 4:1 | School anime, slice-of-life series |
| Teenage protagonist | 6:1 to 6.5:1 | Shōnen and shōjo series, most anime |
| Adult standard | 7:1 | Drama, romance, seinen titles |
| Heroic or idealized adult | 7.5:1 to 8:1 | Action leads, fantasy protagonists |
| Fashion / model style | 8:1 to 9:1 | Character design sheets, stylized art |
Before drawing a full character, decide where on this scale they belong. Then mark out the head count on your page as a vertical guide before you draw anything else. This takes 30 seconds and prevents the most common proportion errors in full-body anime drawings.
Shoulder width typically runs two head-widths for a standard male character, 1.5 for a female character. Hip width in female characters usually matches or slightly exceeds shoulder width. These are style conventions, not anatomical rules — they shape the visual language of the character before personality or costume does.
How Anime Shading Turns a Flat Drawing Into Something That Breathes
Flat base color with no shading looks unfinished. Heavy photorealistic shading looks completely wrong for anime. The answer sits in a technique that has defined the style since the hand-painted cel era of the 1980s and 90s.
Decide on a light source first. Pick a single direction — upper left is most common. Every shadow in the drawing must be consistent with this one decision. Mixing light sources is one of the most disorienting mistakes in otherwise strong anime drawings.
Place the shadow as a shape, not a stroke. Shadows in anime drawings are painted areas, not blended transitions. If a shoulder blocks light from reaching the neck, draw a shadow shape on the neck and fill it in with your shadow color. Hard edge, flat fill.
Choose a shadow color that leans cool or warm. Skin shadows lean slightly purple or cool blue — not grey. Hair shadows darken the base color and often pick up a complementary hue. This color shift is what gives anime drawings their distinctive, slightly painterly quality even when the technique is technically flat.
Add a rim light for dimension. A thin, bright edge along the far side of the figure — opposite the main light — separates the character from the background and adds visual depth. It also looks cinematic, which is why modern anime productions use it constantly.
Two-tone shadow adds polish without complexity. Most anime uses one shadow tone. Adding a second, slightly lighter tone between the base color and the main shadow creates a three-dimensional read without ever breaking into blended shading.
Chibi Anime Drawings: When Cute Becomes the Point
Chibi is its own complete art form within anime drawings, not just a simplified version of the main style.
The chibi approach compresses the human body into an exaggerated form where the head dominates. The emotional payoff is immediate — chibi characters feel warm, safe, and funny, which is why they appear on merchandise, reaction stickers, and comedy scenes in otherwise serious series.
Chibi construction rules:
- The head fills roughly half the total height of the figure
- Legs are short, round, and nearly shapeless
- Arms end in small mitten-like hands — fingers are optional
- The neck nearly disappears
- Facial features cluster in the lower third of the face, making forehead space dominant
- Eyes enlarge beyond even standard anime proportions
- Noses and ears either simplify to dots or disappear entirely
Chibi anime drawings are excellent practice for two reasons. First, they force you to think about character expression and pose when anatomy is stripped away. Second, they are fast to produce — which means more drawing sessions, more feedback loops, and faster overall improvement.
Digital Tools vs. Paper: What Actually Works Best for Anime Drawings
Neither is wrong. Both produce excellent anime drawings in the hands of a skilled artist. The real question is which one fits how you actually work.
Paper and ink builds tactile skill that transfers everywhere. The resistance of paper, the permanence of ink lines, and the impossibility of ctrl-Z forces clean decision-making. Many professional anime character designers still sketch on paper even when all final work goes digital. A 0.5mm mechanical pencil for construction and a set of Copic Multiliner or Micron pens for inking covers everything a beginner needs.
Digital drawing removes friction from the coloring process and makes exploration faster. Clip Studio Paint is the most widely used tool in professional manga and anime illustration — its stabilization tools smooth shaky lines automatically, and its brush engine mimics the feel of real ink on paper. Procreate on iPad handles the full workflow from sketch to final color with a low learning curve. A basic Wacom tablet connected to a computer runs Clip Studio Paint at a significantly lower cost than an iPad setup.
The hybrid approach — sketch on paper, photograph or scan it, then ink and color digitally — is widely used by working artists. It combines the speed and warmth of traditional sketching with the flexibility of digital finishing.
Choose based on what you will actually use consistently. The best tool is the one you pick up every day.
Anime Sketching Habits That Separate Artists Who Improve from Those Who Plateau
Consistency outperforms intensity every single time. An artist drawing for 25 minutes every day for a year develops faster than someone who draws for five hours once a week.
Practice with intention, not just volume. Mindless copying of images builds familiarity but not understanding. Before copying any reference, identify what specific thing you are trying to learn from it — eye construction, hair flow, hand placement. Name it, then draw it.
Use timed gesture drawing. Line of Action and Quickposes offer timed drawing exercises at 30 seconds, 60 seconds, or 2 minutes per pose. These sessions train the hand to find the essential lines of a figure fast, which improves the confidence of every mark you make in longer drawings.
Keep a study sketchbook separate from your art sketchbook. One book is for experimentation and learning — ugly, covered in notes, full of failed attempts. One is for finished pieces. Never confuse the two. The study book has no pressure. That is where real improvement lives.
Draw from your head once a week. Working from reference is essential. But drawing from memory reveals exactly what you have actually retained versus what you just recognize. These sessions are uncomfortable and messy. They are also the fastest diagnostic tool available.
Track progress with dated pages. Date every page of your sketchbook. Flip back six weeks after consistent practice. The improvement is always more visible than it feels in real time.
5 Mistakes That Block Progress in Anime Drawings — And How to Fix Each One
Mistake 1: Drawing the face too high on the head The fix: always place the eye line at the true midpoint of the entire head, not the circle. Measure it every single time until it becomes automatic.
Mistake 2: Treating the outline as the drawing Many beginners draw the silhouette and stop. The outline is just the border. Light, shadow, and interior line work are what make a drawing read as three-dimensional.
Mistake 3: Copying poses from one source only Style convergence happens fast when you only study one artist. Pull references from at least five different creators each week. Your own style develops from the overlap between them.
Mistake 4: Avoiding hands and feet Both are notoriously difficult in anime drawings. Both appear in almost every full-body composition. Avoiding them does not make them easier — it guarantees every full-body drawing stays hidden behind convenient framing. Dedicate one practice session per week to hands only.
Mistake 5: Expecting visible improvement daily Skill growth in art happens in non-linear jumps. There are long flat periods where nothing seems to change, followed by sudden moments where everything clicks. Stopping during a flat period is the only way to guarantee failure. Keep the daily habit regardless of how the drawings look.
Where Serious Anime Drawing Artists Go to Learn and Grow
The community and resource landscape is large. These are the ones worth your time.
Clip Studio Paint — clipstudio.net — The professional standard for digital anime and manga illustration. Offers free tutorials, brush sets, and community assets directly inside the application.
Sakugabooru — sakugabooru.com — A curated archive of exceptional anime animation cuts, organized by animator. Studying individual animators’ work here is one of the most direct ways to understand how professionals approach pose, weight, and line in motion.
Pixiv — pixiv.net — The largest Japanese art sharing platform. Searching any technique or character type here gives access to thousands of examples across every skill level. Follow artists whose work challenges you.
Graphic-sha Publishing — graphicsha.co.jp — Publishers of the original How to Draw Manga reference series, which remains one of the most referenced foundational resources in anime illustration education.
Andrew Loomis — Fun With a Pencil and Figure Drawing for All It’s Worth — These two books from the 1940s remain the clearest written explanations of figure proportion and head construction available. The anatomy principles inside them directly strengthen anime body proportion work.
6 Honest FAQs About Learning Anime Drawings
Q: How long before my anime drawings actually look good? Most people with daily 20–30 minute practice sessions see real, noticeable improvement within 60–90 days. A consistent, polished style that feels personal usually takes 1–2 years of focused work. Progress is not linear — expect plateaus between growth spurts.
Q: Do I need any drawing experience before starting anime? No prior experience is required. Anime drawings are actually a friendlier entry point than realistic portraiture because the rules are more forgiving. Simplified anatomy and stylized proportions mean small errors read as style choices rather than mistakes. Begin with head construction and basic eyes before anything else.
Q: What tools do I actually need as a complete beginner? For paper: one mechanical pencil (0.5mm), one fine-line ink pen (Micron 05 or Copic Multiliner M), and a basic sketchbook. For digital: Clip Studio Paint on a Wacom Intuos tablet covers everything at a reasonable starting cost. An iPad with Procreate is the alternative for those who prefer drawing on a screen directly.
Q: Does learning realistic drawing first help with anime? It helps more than most people expect. Understanding basic skull structure, how shoulders connect to the neck, and how fabric drapes over a bent arm transfers directly into anime drawings — even when the final result looks nothing like realism. Many of the best character designers working in anime today studied classical figure drawing before developing their stylized approach.
Q: How do I develop my own original anime drawing style? Style cannot be forced — it forms through accumulation. Study 10 different artists you admire. Identify what specific choices attract you in each one: the eye shape of one, the line weight of another, the color palette of a third. Over months of practice, these preferences appear in your work without effort. The style is already forming. You just have to keep drawing long enough for it to become visible.
Q: What is the difference between anime drawings and manga drawings? Manga refers specifically to Japanese comics published in black and white, usually with screentone shading and heavy linework designed to read clearly in print. Anime refers to animated productions, but the phrase “anime drawings” describes the shared character illustration style used across both mediums. The two look similar but serve different technical requirements — manga prioritizes print clarity, anime character design prioritizes what reads well in color and motion.
A Realistic Daily Practice Plan for Anime Drawing Progress
Twenty-five minutes a day, six days a week, beats a three-hour Saturday session every time.
Minutes 1–8 — Warm up with gesture Open Line of Action or Quickposes. Set 60-second poses. Draw 6–8 quick gesture sketches. This wakes the hand and eye up before the focused session begins.
Minutes 9–18 — Focused skill block Pick one specific element: eyes only, or hair construction only, or hands only. Draw the same element 8–10 times with slight variation each time. This is where measurable skill is built.
Minutes 19–25 — Apply to a character Work on a current piece or start a new head study. Apply what you just practiced in the skill block. This connects isolated practice to real drawings.
Track which skill you practiced each day. After 30 days, review the list. The gaps — the skills you avoided — become obvious. Spend the next 30 days filling them.
Your First Anime Drawing Starts With One Shape
Every finished character, every detailed scene, every complex expression in the history of anime drawings started exactly the same way — a light pencil mark on a surface, a first decision, a beginning.
The system works. The steps are learnable. The only thing between you and the drawings you picture in your head is time spent actually drawing.
Pick up the pencil. Draw the circle. Place the chin. Find the eye line.
Everything else follows from there. Share your drawings with a community that gives real feedback, stay consistent with daily sessions, and return to this guide whenever a specific technique needs clarification. Your skills will grow — the only question is how soon you start.
References and External Sources
- Clip Studio Paint Official Learning Resources — clipstudio.net/en — Tutorials, brush documentation, and digital workflow guides for anime and manga illustration.
- Sakugabooru Animation Archive — sakugabooru.com — Professional-grade animation study resource organized by animator and production studio.
- Pixiv Art Platform — pixiv.net — The largest Japanese illustration community, used by professional and independent anime artists globally.
- Graphic-sha Publishing — graphicsha.co.jp — Original publisher of the How to Draw Manga foundational reference series.
- Andrew Loomis, Figure Drawing for All It’s Worth — First published 1943, reprinted by Titan Books — The foundational text on figure proportion referenced by professional illustrators across styles including anime character design.